- Log in to the Azure portal at https://portal.azure.com ➢ navigate to the Azure Synapse Analytics workspace you created in Exercise 3.3 ➢ on the Overview blade, click the Open link in the Open Synapse Studio tile ➢ select the Develop hub ➢ hover over the Data Flows group ➢ click the ellipse (…) ➢ select New Data Flow ➢ and then click the Add Source box in the canvas.
- On the Source Setting tab, provide an output stream name (I used BrainjammerBrainwavesCSV) ➢ select the + New button to the right of the Dataset drop‐down text box ➢ choose ADLS ➢ choose DelimitedText ➢ enter a name (I used BrainjammerBrainwavesCSV) ➢ select WorkspaceDefaultStorage from the Linked Service drop‐down text box ➢ enable interactive authoring ➢ select the folder icon to the right of the File Path text boxes ➢ and then navigate to and select the CSV file you created in Exercise 5.2, for example:
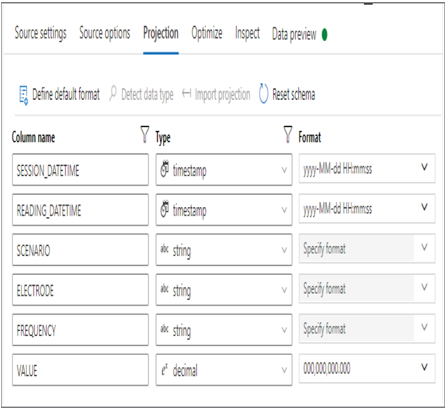
EMEA\brainjammer\in\2022\04\26\17\BrainjammerBrainwaves.csv - There is no header in this file, so leave the First Row as Header check box unchecked ➢ click the OK button ➢ select the Projection tab and make updates so that it resembles Figure 5.21. Note: Hover over the drop‐down text box where you selected decimal ➢ click the Edit link ➢ enter a value of 8 for Precision ➢ enter a value of 3 for Scale ➢ and then click OK.

FIGURE 5.21 Splitting the data source—Projection tab
- To add a sink transformation to the data flow, click the + at the lower right of the Source activity ➢ select Sink from the pop‐up menu ➢ enter a name for the output stream (I used BrainjammerBrainwavesSplitCSV) ➢ click the + New button to the right of the Dataset drop‐down list box ➢ choose ADLS ➢ choose DelimitedText ➢ enter a name (I used BrainjammerBrainwavesSplitCSV) ➢ select WorkspaceDefaultStorage from the Linked Service drop‐down text box ➢ enable interactive authoring, if not already enabled ➢ select the folder icon to the right of the File Path text boxes ➢ and then navigate to the location where you want to store the split CSV files, for example:
EMEA\brainjammer\out\2022\04\28\12 - Leave the defaults ➢ click the OK button ➢ select the Set Partitioning Radio button on the Optimize tab ➢ select Round Robin ➢ and then enter 60 into the Number of Partitions text box so that it resembles Figure 5.22.

FIGURE 5.22 Splitting the data sink—Optimize tab
- Consider renaming the data flow (for example, Ch05Ex06) ➢ click the Commit button ➢ click the Publish button ➢ select the Integrate hub ➢ create a new pipeline ➢ expand Move & Transfer ➢ drag and drop a Data Flow activity to the canvas pane ➢ provide a name (I used SplitBrainjammerBrainwavesCSV) ➢ select the just created data flow from the Data Flow drop‐down textbox on the Settings tab ➢ click the Validate button ➢ consider renaming the pipeline ➢ click the Commit button ➢ click the Publish button ➢ click the Add Trigger button ➢ select the Trigger Now option ➢ be patient ➢ and then navigate to the output directory in your data lake, where you will find the 60 files.
In Exercise 5.6 you created a data flow that contains a source to import a large CSV file from ADLS. The data flow also contains a sink that splits the large CSV file into 60 smaller files and then exports it to the same ADLS container, but in another directory. Both the source and the sink require datasets and linked services to complete their work. As you saw in Table 5.1, the optimal number of files is 60 when your performance level is DW100c, DW300c, or DW500c. Having this many files is optimal when using the COPY statement to import data into a dedicated SQL pool. This is because having multiple files allows the platform to load more of them all at once and process them in parallel. This is in contrast to a single large file, which would be loaded and processed once. In this specific context, the 60 files turned out to be just under 5 MB each. This is an acceptable size; the smallest you would want is 4 MB, as this is the minimum size at which you are charged transaction costs on ADLS. In a larger data scenario, the best cases are between 100 MB and 10 GB for SQL pools, and 256 MB and 100 GB for Spark pools. Finally, when using Parquet or ORC files, you do not need to split them, as the COPY command will split them for you in this case.
